Official Luthiers Forum! http://www-.luthiersforum.com/forum/ |
|
Bending WF Bubinga...Long Post http://www-.luthiersforum.com/forum/viewtopic.php?f=10102&t=3791 |
Page 1 of 2 |
Author: | JJ Donohue [ Sun Nov 13, 2005 12:39 pm ] |
Post subject: | |
Well...I promised I'd publish my attempt at bending so here goes. Some particulars: -SJ style -WFB Thickness = .090-.095 -Bender ...Two 200W and one 150W bulbs. ...Interior lined with aluminum flashing for maximum heat reflection. ...The bottom SS slat coated black for maximum heat absorption. ...Also employed a silicone heat blanket on the top side of the wood. ...Measured temp using a StewMac surface pyrometer at the top of the lower bout. -Wood Prep ...Cut and contoured the side to dimensions listed on Michael P's OLF-SJ drawing. ...Sprayed the wood liberally with "Super Soft" veneer softener and let sit for 30 minutes. ...Wrapped the side in craft paper and sprayed distilled water until it was soaking wet. ...Marked waist position. -Heating Process ...Followed John Hall's posted suggestions: ...Preheated to 325*F ...Sandwiched bottom slat/wood/heating blanket/top slat. ...Load the sandwich into the bender and allow the temp to reach 325*F ...Lower the waist caul just enough to hold everything in place ...Slowly set the lower bout ...Slowly set the upper bout ...Slowly close the waist caul over a period of 1 minute ...Keep the 325*F heat on for 3 minutes ...Turn off heat and allow to cool to RT ...Turn on heat to 300*F for 5 minutes ...Turn off heat and leave in the press for 3 hours minimum. The process went well with no cracking or splitting sounds...only steam hissing. When it came time to remove it from the press it came out as dry as a bone. Unwrapping the craft paper revealed a perfect bend...no cracks, chips or distortions...only some slight grain raising. The bending was a success. There is one problem which still has me steaming... During the process of setting the upper and lower bouts and before bottoming the waist caul, the waist location on the side shifted toward the upper bout. This resulted in having more wood at the neck center line and no wood at the tail center line. So I walked away from the whole mess and played golf today. In order to use the side, I'll need to get it flat again and re-bend. I plan to flatten by heating it up with the silicone blanket and keeping it weighted after it hopefully relaxes. Any suggestions would be appreciated. Steve, I'm confident in the process as I described but a sample of one does not necessarily make a standard procedure. I'll post more as I do the re-bend as well as the second side. Note to self...make sure the waist location doesn't shift. I may set the waist caul first next time around the way I've done it in the past. That way, the waist location won't shift when I set the lower and upper bouts. |
Author: | Darin Spayd [ Sun Nov 13, 2005 12:57 pm ] |
Post subject: | |
JJ, Bearing in mind that I'm just a "wanta-be", could it be possible to incorporate temporary clamps to hold the side in place once the waist caul is partially lowered? Once the bouts were secured, the clamps could then be released and the waist lowered completely, maybe? ![]() |
Author: | Don A [ Sun Nov 13, 2005 1:00 pm ] |
Post subject: | |
JJ, if it didn't shift too much, just consider the gap at the end as part the route for your end graft and work from there. You can clean up any shift to the profile in your radius dishes. It would be a lot easier than taking a chance on flattening and re-bending. Just one opinion. |
Author: | LanceK [ Sun Nov 13, 2005 1:10 pm ] |
Post subject: | |
I second what Don says, if it didnt shift too much, you may be able to just carefully glue up the end block and make up some missing space with the end graft. When I load up my bender, I get everything lined up, then use a couple of finger clamps to hold the whole sandwich together, then I snug down the waist. I use a sharpie to mark the waist on the side of the wood, and always double and triple check its dead on line. |
Author: | Shane Neifer [ Sun Nov 13, 2005 2:29 pm ] |
Post subject: | |
JJ, I had the same problem on this first guitar I am working on. But it happened on the cut-away half that has a very tight bend. All went well except the shift forward. So I left it, I am still thinking about the design of my "planned" one inch wide end graft ![]() That's the neat thing about custom made guitars, when it is finished only you know what was meant to be...."it's an opportunity, not a problem!!!" Shane |
Author: | JJ Donohue [ Sun Nov 13, 2005 2:33 pm ] |
Post subject: | |
It's about 1" off center which would make a 2 inch gap at the end block. I suppose I could get creative with a patch or an inlay. Right now, I'm inclined to correct the mistake but I need to think about it awhile. |
Author: | Steve Kinnaird [ Sun Nov 13, 2005 2:39 pm ] |
Post subject: | |
JJ- you're my hero. I'm happy for the successful bend, but sorry about the shifting register. Could you still use as is? Perhaps a wee bit larger tail wedge? (Anything but rebending!) Actually, there is an article in the latest American Lutherie that deals with this problem. He made a steamer out of a plastic garbage can, and steamed his mis-bent side for couple of hours. After which he said the side was quite flexible. He then clamped it to something flat, and let it dry. Then, he rebent in the correct direction. You might be able to finesse the curves since you are only shifting the waist area a bit. So instead of going back to flat, perhaps you could just fudge the curves a bit? (Anything but rebending!) Good luck, Steve |
Author: | CarltonM [ Sun Nov 13, 2005 3:46 pm ] |
Post subject: | |
[QUOTE=JJ Donohue] It's about 1" off center which would make a 2 inch gap at the end block. I suppose I could get creative with a patch or an inlay.[/QUOTE] A Wechter-style access panel! ![]() |
Author: | Don A [ Sun Nov 13, 2005 3:59 pm ] |
Post subject: | |
A Craig Lavin inlay of a waterfall ![]() |
Author: | JJ Donohue [ Sun Nov 13, 2005 4:21 pm ] |
Post subject: | |
Carlton...I'm not familiar with the access panel. What would one need to access? Don...The CL Waterfall inlay would be cool! A picture of the ZootMan would certainly be appropriate since he is the source of my addiction ![]() Another thought I had is my 3 dot triangle logo in a field of contrasting wood...like maybe I designed it that way from the start...yeah, that's the ticket! |
Author: | Shane Neifer [ Sun Nov 13, 2005 5:08 pm ] |
Post subject: | |
Another thing I was thinking about for mine was a centre graft and then two purfling lines further out (like over the joint!). It all depends on how forgiving the grain is on your sides as to whether you would notice that one piece was longer than the other. On rebending, I think that I agree with Steve. On this same side I too shifted forward (Obviously!!) but my steel slat also buckled right at the tight bend and I didn't notice until it had cooled and I removed it. I took the slat, hammered it back flat, fired up the fox bender again (3 150 watt bulbs, no heat blanket) and then put the side back in the bender and shifted things aft a bit and gained a bit of the back end of the side back and removed the kink created by the buckled slat. So you might try moving it back, even if you had to do it over a series of rebends. You could try on and see if you can again some. Shane |
Author: | RussellR [ Sun Nov 13, 2005 8:26 pm ] |
Post subject: | |
HI JJ I think this is what Carlton means. ![]() ![]() The Guitar in the picture is by Ben Rayner who works out of Cambridge England. |
Author: | Bobc [ Sun Nov 13, 2005 10:10 pm ] |
Post subject: | |
JJ I don't think you want to ruin your guitar with my picture on it. I use the same bending method and it does work well. The key to doing the waist last is that it keeps the steel slats very taunt which aids in avoiding cupping or potato chip effect. I place a spring clamp on either side of the waist caul when bending the upper and lower bout. It helps hold in place at the waist and prevents shifting. Then remove when cranking the waist down. |
Author: | Pwoolson [ Sun Nov 13, 2005 11:41 pm ] |
Post subject: | |
JJ, I'm not sure I'd try to straighten it. First why don't you try just putting it back in the bender and getting it lined up where you need it to be and rebend it. You'll probably have to do several cycles of heat to "set" the bend but I think you'll be more successful this way than straightening it and then rebending it. |
Author: | JJ Donohue [ Mon Nov 14, 2005 12:36 am ] |
Post subject: | |
Thanks for the feedback, Paul. It sounds like the consensus from the experts is to re-install the bent side and try to shift the waist location. I'll give that a try. That's precisely why I elected to stop and play golf rather than approach the fix with a pissed-off attitude! This forum is amazing...we're so fortunate to have such resources to call upon when problems arise. Many thanks to the members of the OLF Rescue Squad! I'll keep you posted as I try to get the side back to normal. |
Author: | Pwoolson [ Mon Nov 14, 2005 1:12 am ] |
Post subject: | |
JJ, do you have a bar in your waist area? This is an addition that Charles came up with shortly before I studied with him and it makes all the difference. ![]() I'm not sure if the LMI plans/kits include this bar. If you want more info, let me know, I'll post more/better pics. Paul |
Author: | Bobc [ Mon Nov 14, 2005 1:33 am ] |
Post subject: | |
Paul I would sure like to see more pic's of that bar. |
Author: | Pwoolson [ Mon Nov 14, 2005 2:17 am ] |
Post subject: | |
OK, I'll attempt to explain this. I'll assume that none of the plans use this design and that none of you have ever heard of it (I know I'm wrong, but that's how I'll attempt to go about explaining it. ) The first thing you'll need is a notch in all of you forms. Make it at the very apex of the waist curve and 1" deep by 1/4" wide. This notch will accept the bar as it's lowered. This will allow the bar to be completely burried into the form thus allowing the caul to seat all the way into the curve. If you make the notches in the very apex of the curve and make a mark on what will be the very apex of the wood, this also serves as a registration system. 
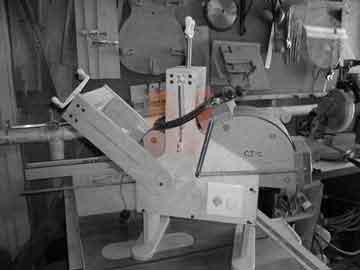
The bar itself is 1/4" by 1" piece of aluminum with some sort of notch in the ends to accept a spring. The spring is attached to the top of the tower and when hooked to the bar, applies counter pressure to the waist bend. 
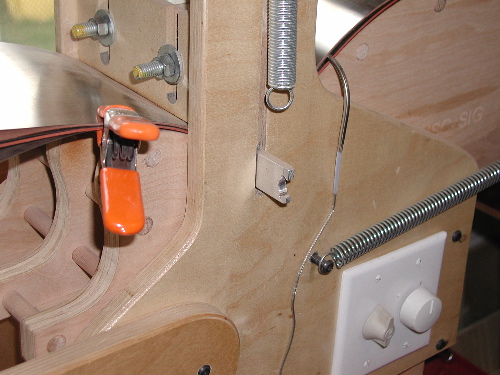
As you can see in the last photo, the spring is attached to the bar and the slats/blankets/ wood pack is pulled tight against the caul at the waist (it looks, in the photo, like there is a large gap but the pack is tight against the very center section of the caul). This does two things: 1) allows you to position the pack with the waist line right where you want it, apply the spring tension and not worry about it slipping and giving you a bad bend as JJ just experienced. and 2) applies counter pressure at the apex of the bend, helping to prevent cracking at the waist. I'm trying to work on a way to incorporate this into the cutaway tower but there are so many non-constant variables that it is very difficult to make it work. Anything I missed? |
Author: | L. Presnall [ Mon Nov 14, 2005 2:32 am ] |
Post subject: | |
Just a quick question then on the Super Soft II...I've been letting the wood sit overnight after spraying...you did the WFB with it on there just a half hour? Cause if so, I just saved a ton of time on future guitars.... ![]() |
Author: | Shane Neifer [ Mon Nov 14, 2005 2:57 am ] |
Post subject: | |
Paul, I bought the LMI plan a couple of years ago, maybe three, and it does show the bar and I have it in my side bender just as you show. Shane |
Author: | JJ Donohue [ Mon Nov 14, 2005 4:19 am ] |
Post subject: | |
Paul...I have the bar and springs exactly as you show in your pics. The LMI plans show this detail which I incorporated when I built the fixture. In spite of the tension, it obviously slipped when I set the bouts before completely lowering the waist caul. My big mistake was in not noticing the slip. That won't happen again! Larry...I can't comment on whether leaving the relaxer on longer before making the bend would make a difference. When I do the touch-up, I'll leave it on over night and maybe get more pliability. |
Author: | csullivan [ Mon Nov 14, 2005 4:44 am ] |
Post subject: | |
Hi JJ, not that it matters a great deal at this point, but having the sides shift as much as you have described sounds unlikely. Are you sure you didn't just put the sides in the bender with the ends reversed so that the upper bout was at the lower bout end of the bender? On a Fox type bender you only bend one side at a time. It's doubtful both sides would have slipped by that much. Just a thought. Craig |
Author: | JJ Donohue [ Mon Nov 14, 2005 7:22 am ] |
Post subject: | |
Craig...I only bent one side. The remaining side remains un-bent. It was in fact oriented properly. The side was cut with 1/4" extra on each end and profiled for the taper leading to the neck area. The waist position was marked...the mark slipped when I set the bouts. I sometimes have an uncanny predisposition for making the unlikely happen! ![]() |
Author: | CarltonM [ Mon Nov 14, 2005 8:07 am ] |
Post subject: | |
[QUOTE=JJ Donohue] Carlton...I'm not familiar with the access panel. What would one need to access?[/QUOTE] JJ...Yep, Russell got it right. Wechter has a patent on this design (and yes, it seems no one had thought of it before him), but he'll let any builder use it free of charge if you give him the credit. More than fair. Just ask. The removable panel gives excellent access to any electronics, whether installing the first time or changing them later, and it makes interior adjustments/repair almost easy (and frees you to move the soundhole, if you like, without worrying about those issues). Abe's mentor, Richard Schneider, adopted the panel as soon as Abe designed it. |
Author: | PaulB [ Mon Nov 14, 2005 12:18 pm ] |
Post subject: | |
Same thing happened to me on my first side, luckily I realised before I'd finished bending so I could re-adjust. For the second side I drew some registration marks on the side of the form to show where each end of the side has to line up with, and I check it as I'm bending each bout. |
Page 1 of 2 | All times are UTC - 5 hours |
Powered by phpBB® Forum Software © phpBB Group http://www.phpbb.com/ |